Looking inside your Raw image data
With all the fuss over raw files, have you ever wondered what your
raw image data "looks like"? Normally your raw data is carefully
massaged before you see it. But we thought you might want to "look under
the covers" and get a chance to visualize what the Raw converters start
with. So we've posted several different "views" of a simple ColorChecker
target photographed with the Nikon D1.
We'll start with the NEF
itself, in case you want to download it for comparison: colorchecker.nef
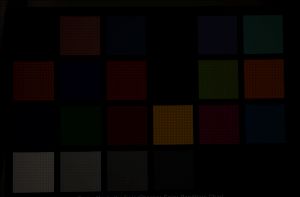
First we'll look at the literal Raw sensor data. To show you this all we have
done is "colorize" the sensor information, by correctly coding the R, G,
and B sensors as Red, Green or Blue, but the information is not
interpolated yet, so each pixel in the file has only one of the three
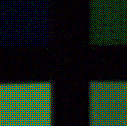
colors. In the middle is a close-up of one section (intersection of the
white & bright gray squares plus the blue and green above them) so you can see
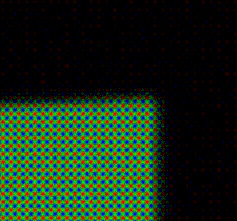
the "screen door" effect of the non de-mosaiced (is that even a word?)
sensor data. For a better visual we've zoomed in further (and up-scaled)
a small piece of that section. The TIFFs for each image are available by
clicking on them:
|
|
 |
Raw leveled sensor data
(11MB TIFF)
|
Close-up of a patch intersection
Lower patches are White & Gray

Click to get TIFF for a better view
(Image Auto-Leveled for clarity)
[NOTE: This can look odd in Photoshop
as pixels have R, G or B, not all three
and they alternate of course)
|
Scaled & further zoomed
sensor data
from the "white" patch corner
Click to get TIFF for a better view
(Image Auto-Leveled for clarity)
|
If you want to play with this file in Photoshop, here is the (11MB)
TIFF. Note that there is a Levels layer which scales the image to
reflect the fact that the camera only uses 0-4095 of the 16-bit space so
without Leveling it is essentially all black. If you look at the image
in Photoshop you'll see solid patches of color, but that is because as
Photoshop scales for the screen it winds up essentially interpolating
the pixels. If you zoom in to see individual pixels you can see the
actual data.
| Next, we took the same raw data and interpolated the it to
produce full RGB. You'll also notice that even with the leveling
the image is quite dark. That is because it is linear (gamma=1)
data. If you shift the gamma on the levels layer (similar to the
"Tone" setting in your camera or Raw processor) then you can
start to see the color appear: |
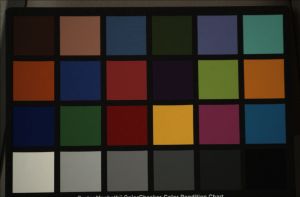 Interpolated & normalized Raw Data
|
Some Raw converters will give you access to the interpolated but
uncorrected linear data, similar to this image. Typically though the
next steps in image "development" would be white balance (although
sometimes that is combined with another step).
What's with this "encrypted White Balance" furor?
Raw sensor data is normally not affected by the white balance setting
on the camera. However, correct interpretation of the data requires that
a white balance be assigned to the data so that it can be shown in the
way the photographer intended. In simplest terms white balance is the
ratio of cool to warm tones, typically expressed as a "correlated color
temperature" from as low as 2700K (Incandescent) to 10,000K and above
for very blue high altitude & deep shade light. If the program reading
the raw file does not know the WB setting made by the photographer it
needs to "guess" or attempt to automatically determine an appropriate
WB. This is of course frustrating to the photographer who sets the WB or
paid for a camera with an extra sensor to help determine the correct
Auto WB (since the data from that sensor is also not available to the
raw processing software).
White balance is most
frequently encoded in one or both of two different methods. First, it is
often encoded as an ASCII string providing a rough guide to the WB used.
For example, Nikon cameras encode "CLOUDY" or "AUTO", etc. They also
encode the +/- setting. These fields are very useful, but since they
have no standard definition the Raw file processor needs to either have
a lookup table based on camera model for looking up the appropriate
color temperature or just estimate based on common industry practice.
The second encoding is a pair of numbers representing the amount by which
the raw process should "multiply" the red and blue sensor data
(which are enough to adjust for variations in Kelvin temperature for
light sources that are full spectrum). These numbers take the guesswork
out of interpreting the camera settings. In particular if the
camera is set to "AUTO" or "PRESET" then the only accurate way to
determine the WB intended by the camera is to read those numbers. That
is why these two numbers are
a major piece of the encryption controversy. They have always been hard
to find (or missing) but in the Nikon D2X they have been deliberately
obscured (also refered to as encrypted).
Tone and Color Correction
Also, tone (often called "gamma" correction although it is usually
done with a lookup table not a strict power function), color correction
and any other optional filtering, correction or sharpening are applied.
These vary greatly with the converter used and contain a great deal of
the "secret sauce" that differentiates competitive offerings. Some of
them rely on image meta-data (documented and undocumented) and some also
rely on external knowledge of the camera--obtained from test targets,
etc.
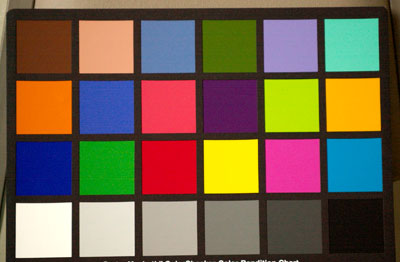
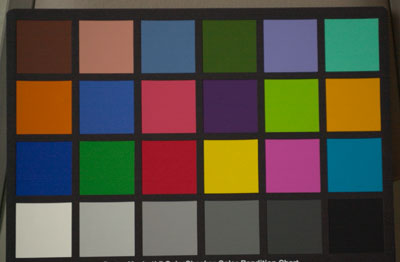
For comparison, below are (resized) JPEGs from the default processing
in Bibble & Capture of the
same image, showing that there are different interpretations of even
such a "simple" image as a color checker. Both programs offer literally
dozens of options for customizing the final rendering of the image:
 |
 |
| Bibble 4.24 default conversion |
Nikon Capture 4.21 default
conversion |
Have fun!--David Cardinal
Special thanks to Mike Ouye for help with the Raw file processing
utilities.
|

![]()
![]()
![]()
![]()
![]()
![]()
![]()
![]()