DigitalPro Shooter Volume 2, Issue 18, January 5th, 2004
Welcome to DPS 2-18: All about digital camera color: We trust you had a happy holidays. This issue is devoted to one of the most elusive aspects of understanding digital cameras--how they reproduce color. We won't make you a color expert or color scientist in the few minutes it'll take you to read this article, but at least we can clear up a few mysteries and help you understand some of the essentials.
Whenever a new camera is introduced there is a flurry of activity on photo websites worldwide. Inevitably there is some horrible problem where the camera takes a logo colored jersey and turns it puce, or a model's expensive skin and turns it ruddy. Theories fly fast and furious. Anecdotal evidence is presented by hundreds, many of whom don't actually own the new camera. Loyalists defend the brand and model to the death against the charges of the opposition infidels that the camera is hopeless. Software is tweaked, hacks are posted, magic recipes are sold. Finally firmware is released, the camera is cautiously and silently updated by the vendor and slowly the furor dies down and everyone gets back to making a living by making great images. Until the next model comes along. The Nikon D1, the Canon 1Ds, and most recently the Nikon D2H have all be the subject of these tempests. What's it all about? After 10 years of manufacturing pro-quality digital cameras why is it so hard to produce them so they make an image everyone can be happy with?
What's up with R, G, B:
Tri-stimulus color in a nutshell
There is nothing that requires images be captured as Red, Green and Blue--or Cyan, Magenta and Yellow. Our world actually exists as an infinite number of different colors, ranging along the spectrum of light from ultraviolet to infrared. But camera makers, just like nature, have to make a tradeoff. The more different color sensors they use, the less of the total light is captured by each color, the more expensive the mechanism is to build and the more complex is the math to reassemble the results. Fortunately for us, evolution sorted this out pretty well millions of years ago.
|
Humans and many animals use sensors with three different sensitivities to approximate the colors in a scene. Researchers have gone back and shown that the choice of those sensors is optimal for differentiating between different subjects in nature. Our ancestors learned to see in color as a survival trait. The three different color sensitivities of our eyes are an example of tri-stimulus color and are referred to as the Human Visual System (HVS). Tri-stimulus color relies on an essential trick which is also its weakness--describing infinitely many colors with just three numbers. |
Because there are only three sensors in an RGB system and we need to see an infinite number of colors, we need to calculate which pure color is represented as the particular combination of the three primary colors received at any point. Our red sensor alone, for example, can not distinguish between a little bit of red light at 580nm--where it is very sensitive--and quite a lot of light at 650nm, where it is less sensitive. Only by checking to see how much blue and green are also found can the camera calculate what color might be in the scene. This creates all sorts of possibilities for error. Our brains have many many clever mechanisms for trying to reduce these errors, but even humans can easily be fooled by colors. There are dozens of famous illusions based on this premise. Research labs have experimented with as many as 12 colors to reduce errors, and Sony has introduced a sensor with 4 colors, but for now most of us are stuck using three--just like our eyes.
Cameras in particular are prone to four errors related to the way they sense color: white balance, metamerism, non-visible (IR) light and different color definitions. We'll look at each in turn:
- Color Constancy (White Balance): The light
entering the lens is the product of both the original light source(s) and
the subject off which they are reflecting. But what we think of as the color
of the subject is only its reflectance. So we need to correct for the effect
of different types of light. The human eye is pretty good at this and so far
digital cameras are at best okay. So, for example, the red our camera sees might be a red
subject under white light or a white subject under red light. The only sure
way to correct for this type of error today is with careful setting of the white
balance for each scene. White balance is a fancy term for telling the camera
what color light source is illuminating our scene. Calculating a custom white balance using a gray card
or other neutral target is ideal, but estimating the color of the
light--whether it is reddish and warm like incandescent lights or sunset or
bluish and cool like shade or many inexpensive flash units--is a good
approximation. The color of light is referred to as its temperature,
since it correlates to the color of a heated chunk of iron at various
temperatures. Incandescent lights tend to be around 3200K (Kelvin), Sunlight
is from 5200-6500, and cloudy or shady conditions, as well as sunlight at
high altitudes go up from there. You only need to know the color temperature
if you have to dial it into your camera. Otherwise you can create a custom
white balance preset, use the presets provided (cloudy, sunny, flash, etc.) or just
shoot raw and tinker with it on your computer. We have a must read article
from Moose on White Balance which
will answer your questions about many of these terms and how they are
applied.
- Metamerism: This is a fancy word meaning
fooled. Because your camera (and your eye) only has three measurements for
each color, it is almost inevitable that in some cases two different colors
have the same RGB output--in other words, they look the same to the camera
sensor. In particular, two colors which look different
under one kind of light might look the same under another kind of light. The
eye has a really cool technique for helping with this problem. The presence of
one color can actually retard or subtract from another color. This and other
fancy processing helps the eye separate colors. Your camera
sensor isn't smart enough to do that, but the color processing firmware or
software will work to do the same thing. But for every camera there are some
cases where two different actual colors look identical to the camera. It is
a matter of either luck or the skill of the camera designers whether the
color is shown as the one you prefer for that particular scene. When coupled
with the Infrared (IR) problem below, metamerism is responsible for the "red
shifts" that plague some of our current model digital cameras.
There isn't much you can do about metamerism except to attempt to control your light sources. Full spectrum lights--near daylight in temperature if possible--are your best bet for minimizing the colors that will fool your camera. Just like our eyes, our cameras are designed for ideal daylight conditions.
- Non-visible light (Infrared): The eye has
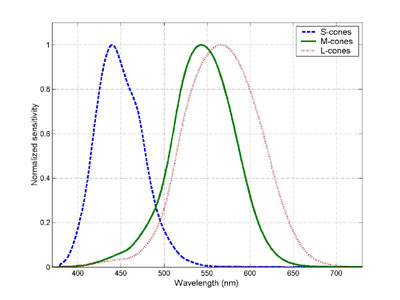
amazingly nice filters. The HVS response diagram above shows how nearly
ideal the sensors in the eye are for selecting their three primary colors.
But camera filters are unfortunately not quite as elegant. Most of them have
a second area of sensitivity outside the spectrum of visible light. Coupled
with this, the native semiconductor material used for sensors is sensitive
up to around 1100nanometers--well up into the Infrared area--while our eyes
can only see to around 700nm. As a result, cameras as originally designed
are subject to interference from IR light. This could be heat from flushed
skin, special reflections given off by flowers to attract IR-sensing
insects, or any other source of otherwise invisible IR. So almost all
cameras incorporate an IR filter permanently mounted in front of the sensor.
A few models have removable filters, so you can experiment. But IR filters
aren't perfect either. The more IR you want to filter, the more you start to
trim off pieces of the visible spectrum.

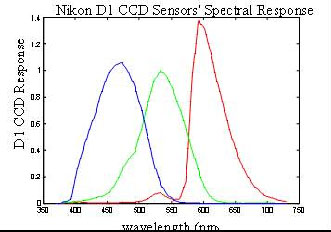
One example of this tradeoff has been the Nikon family of pro SLRs. The D1 family contained a sensor array + IR filter that were quite permissive, letting in as much red light (the closest to IR) as Green and Blue. The result was more signal and less noise in the red channel, but at a cost. The effect of the IR sensor was to make the red cut-off very sharp (instead of the smooth falloff of the HVS) so the camera was easily fooled into confusing red and magenta and in some cases blue and purple--Mark Buckner of the St. Louis Blues was threatening to have the team renamed the St. Louis Purples when he first got his D1. 
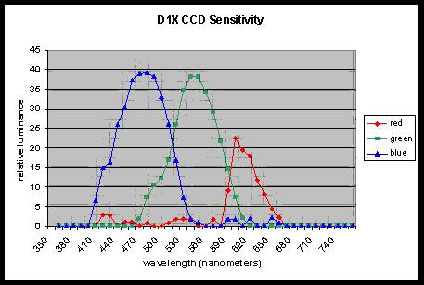
Then, in the D1X and D1H, Nikon strengthened the IR filter greatly. Now the raw image only had half as much red as it did green or blue. Notice how they have almost no sensitivity past 680nm compared to the D1 which was still recording up to nearly 730nm. The result was much more accurate color although at the cost of some of the sensitivity in the red channel. Most recently the D2H has shifted back the other way, with increased IR sensitivity. This gives the raw image plenty of red signal to work with for maximum signal to noise ratios--except when it is polluted by Infrared and causes errors in color. The effect of too much Infrared can be minimized by placing a Tiffen Hot Mirror (IR cut-off) filter on your lens. One piece of good news is that the increased sensitivity to IR makes the D2H a better camera for IR photography than the 1X or the 1H, but if you don't care about IR you may opt for the Hot Mirror filter. Canon addressed a similar issue in the 1Ds with some new software and firmware. If it bothers you for your style of photography, stay tuned as I expect Nikon to do something similar.
4. Different definitions for Red, Green and Blue: As you've already noticed, your camera's sensors are not the same as your eyes. What you may not know is that your camera's sensor has a different definition for Red, Green and Blue than your computer. If you use color-managed applications like Photoshop or DigitalPro then you're used to the idea of a working space--perhaps Adobe RGB or sRGB. These are well defined color spaces with widely accepted definitions that can be reproduced on many devices.

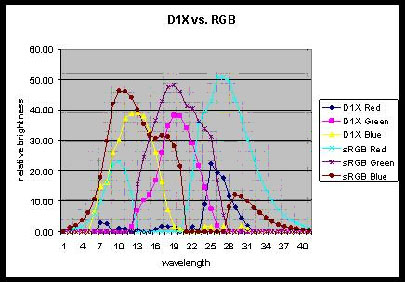
But your camera natively shoots into a color space of its own--typically called its color gamut--or the range of colors it can capture. To the left is a comparison of the the native sensitivity of the sensor of a D1X compared to sRGB. Until recently cameras output what they captured and the rest was left to the poor photographer. Custom profiles or profile conversion software was a must. Fortunately, recent models have incorporated firmware to do the transformation from the camera color space to a more standard space.
Consumer cameras now almost universally offer to produce sRGB--suitable for consumer monitors and printing and perfect for the web, while pro models normally offer the choice of at least sRGB and Adobe RGB. Are these transforms perfect? Nope. But they're automatic, instant, and a lot easier than having to use a custom profile or another processing step if you can avoid it.
What can you do? If your camera isn't giving you the color you want even after you've taken the various steps I've described to get the best image from it you can, you have three basic options: 1) Fix it on the computer--shoot raw if you find yourself doing this all the time, as it gives you more flexibility, 2) Buy a different camera, or 3) Create a color profile for your camera using a package that works. The only one I've found that really does the job is Coloreyes. I get lots of profiling tools to evaluate, but theirs is the only one that does the job for cameras without requiring different profiles for each shoot. The color profile can't fix all issues, but if done correctly will address many of the IR and metamerism problems. See the section in the TDG Update ebook on how and why it works.
Other Issues: There are many other issues affecting the capture of color, including the spectrum of the light source. Fluorescents, for example, typically do not provide light at all the visible wavelengths so many colors are missing from the resulting image. The newest cameras have white balance presets specifically designed to correct for this by amplifying those colors that are suspected to be missing from the image capture. But the four mentioned above are at the root of most of the confusion and controversy about camera colors, so understanding them will have you well on your way to being able to understanding how your camera works and which techniques you should worry about. There are also issues relating to contrast, saturation and noise which are also very important that we'll cover in future issues of DigitalPro Shooter. If you're not already a subscriber, you can subscribe from our homepage.
Learning more: This is probably already way more than you need to know to enjoy your camera. But if you're interested or need to know more, there are a variety of resources. For the practical application of camera color and color on the computer, I highly recommend both Real World Color Management which I reviewed in DPS 2-4 and Dan Margulis's Professional Photoshop: The Classic Guide to Color Correction. In addition, since color, raw files, and landscape photography go hand in hand, I work many of these topics into my talks at events such as the Digital Landscape Workshop in Yosemite in March and my Fall Color seminar in Michigan in October. And on the inevitable rainy day in Alaska in July, we can spend some time on it between photographing Grizzly Bears and Puffins. If you'd like to see more events like these or have particular suggestions, let me know. The D1 Generation and TDG Update books also offer plenty of information and advice on how images are processed inside your camera. Finally, we encourage you to visit our Color Forum where you can share your experiences or learn from our experts as we compare notes on what works and what doesn't work in our photography.--David
2004 Photo Safari and Event Calendar
May 24-28, Birds of the Bay Area, Palo Alto, CA
July 21-28, Alaskan Grizzly Bears and Puffins
October 8-11, Fall Color, Michigan
Other Events:
January 8, Sequoia Audubon
February 28-29, Palo Alto Bird Photo class through PA Enjoy
March 7-10, Guest Shooter at DLWS in Yosemite
 |
DigitalPro Tip:If DigitalPro isn't displaying your NEF files as fast as you'd like, check the image quality setting. At High quality DP is basically processing every image at full resolution, like Photoshop would for final printing. That's probably overkill for review and editing. You can also turn color management off for basic image review and it will run faster. You can turn it back on when you get to any color critical work. You can always download the latest version of DigitalPro2 for Windows at the DP2 site. |
 Response of the human visual system to light