Bags, Bags and More Bags
Okay, so I have a closet full of bags. You probably do too--or you will if you travel with a lot of gear for long enough. Each change in aircraft configuration, carry-on policies, or camera body and lens sizes can open the door for a new bag to become useful. And of course different length trips and different shooting assignments can change what you need to bring and the best way to carry it.
There is no way to provide an exhaustive list of the options, but I've laid out below--by category--some of the bags I find the most useful and why.
Bags--Checked Luggage
First, I always lock all my checked luggage with TSA-approved Combo Locks . They don't guarantee anything, but they put one more line of defense between your gear and a thief. They may get cut off -- particularly in foreign countries -- but they are inexpensive (less than $10 each) so I carry spares. I'd rather do that than only secure my bag with a cable tie which anyone can cut in a heartbeat.
For my main checked bag I bring some type of "duffel" style bag. If I'll be on larger planes (those with real cargo holds and baggage handlers) the whole time, then a 30" Eagle Creek Wheeled Duffel fits the bill. Anything bigger is too easy to load to over the 50 lbs baggage limit. Anything smaller won't fit my Gitzo 1325 legset and the other gear such as hip boots that might need to be in there. For trips where we'll have small charter planes (normally Cessnas or similar) I have a similar duffel but without wheels. That makes it smaller, lighter, and easier to fit into the odd spaces in a little plane. It's not as fun to lug through an airport, but most airports provide luggage carts either for free or a nominal fee so that hasn't proven to be much of an issue.
I normally also have to check some amount of electronics gear. If nothing else a bag of chargers, cables, batteries, spare mice and software CDs and external disk drives. Sometimes I also need to check trickier items such as radios or GPS units. But for those items--which are a magnet for thieves--I've increasingly taken to stuffing them in socks and stuffing the socks into my spare shoes in the bottom of my duffel. So far that seems to have protected them from mischief.
For the electronics gear that I do check I've been using a Pelican 1510 Case . It is actually small enough to carry on, but it is built like a tank and is a perfect compromise for a 2nd checked bag--large enough to fit my electronics and even a portable printer or projector while small enough to load easily into a Cessna or other bush plane. I only use the bottom & top foam pieces, plus some dividers. Particularly fragile gear gets it's own soft cover within the bag. Unfortunately, hard-sided cases have become so synonomous with expensive equipment that they are also a target for thieves. I'm going to be experimenting with soft-sided alternatives and will be reporting my results in future issues so stay tuned.
Bags--Carry-on Photo Gear
Here too the bag I carry depends both on the gear I'm taking and the types of planes we'll be flying. For the increasingly common RegionalJet flights throughout the US and some other parts of the world I rely on Moose Peterson's very slick designs for the MP-1 (large enough to accomodate my 600f/4 plus my other gear) or MP-3 (large enough for the 200-400 plus my other gear) either of which will fit into the regulation size overhead. If I need the heavy duty backpacking straps used on my Lowepro CompuTrekker Plus AW and will be on planes with over-sized overheads, then I may bring it instead. However it is a very large bag and not always easy to stow. The smaller CompuTrekker AW
 is easier to travel with but will not accomodate my 200-400 plus 2 full-size D-SLRs, though. If I need to backpack with the 600f/4 (which I don't do as much as I used to!), then the LowePro ProTrekker gets pulled out. There is even a rolling version of the Computrekker, the Rolling CompuTrekker
 , which is easier on your back, but quite large and will be hard to fit on some planes.
All of these bags can be carried on most of the time if you are alert, confident and get them stowed quickly and effectively before the plane gets too crowded. But there is always a risk that any bag larger than the airlines' regulation size (typically 14" x 22" x 9") will need to get "cabin-checked". It doesn't go through as many bumps that was as if you check it at the counter, but I've still had equipment damaged that way so I work very hard to keep my photo gear with me on the plane.
I've read that others take bags as large as a Roadrunner AW with them on the plane, but that's a really big bag and I'm quite nervous that it would need to be cabin checked on the smaller RegionalJets that I fly a lot (and I don't really feel the need to have a rolling camera backpack) so I've never tried it.
Bags--Carry-on Briefcase
It used to be that I could get my photo gear and my computer all in one carry-on photo bag. But now that carry-ons size is more limited and I'm trying to carry most of my electronics with me to prevent theft, I've found that I need to rely more heavily on a rolling briefcase when I travel. I've been fortunate enough to have spent the last several months traveling with two of the best rolling carry-on cases with two very different designs, each of which is a great bag and has its uses:
The Swiss Army Rolling Trevi Briefcase is a gem of a briefcase. It is very sturdy and constructed of very tough ballistic nylon for starters. The compartments are nicely designed so that there are places for nearly everything you can think of without taking too much room. Even the padding is well thought out so that the key electronics items are well padded without the padding gobbling up too much room.
The Trevi features two well-padded internal sections, either one of which was large enough to accomodate either my Sony laptop or my Canon iP90 Photo Printer . This allowed me to carry both--ideal for teaching photography and digital workflow on safari.
One nice innovation is three neoprene "sleeves" in one of the main compartments. They are similar to the vertical neoprene lens sleeves found in various LowePro bags except shaped a little wider than deep and wind up being a perfect place to store your PDA, external drive, headphones, or similar small sensitive electronics.
The front pocket of the Trevi has room for all those last minute items but if you stuff it full you'll have quite a deep bag that will have trouble fitting under your seat or in small overhead bins. See my Travel Workflow below for how I make use of this pocket.
The most unusual pockets on the Trevi are the two tall narrow ones on either side of the rolling handle. They come with a small net bag each to make it easier to stash and retrieve small items in them. I assume one logical use would be for spare socks or other smallish clothes but I found them absolutely perfect for my Targus Universal Power Adapter on the one side and a pair of spare batteries for my laptop on the other. This made it incredibly easy to grab a spare battery when I needed one on the plane (since my bag is often under my legs by then and it's much easier to reach down and grab a battery than to have to haul it out and rifle through it.
The Rolling Trevi is designed to be about the maximum size for a airline carry-on. If you pack it heavily, expand it using the optional 2.5" "expansion" capability, or clip on a cellphone or use the water bottle holder it will technically violate the airlines size limit, but if packed just to it's "normal" size it is 15" x 9" x 17" which is close enough to the official limit to keep just about any airline happy.
While the Trevi is perhaps the pinnacle of dedicated rolling briefcases, RoadWired has taken a different but very effective approach to designing the Roadster Convertible. By using a reconfigurable "core" the Roadster can be set up as a traditional briefcase, as a computer case, an overnight bag or even as a hybrid photo + computer briefcase.
What I found most unique about the Roadster was that I could set the removable "core" (called an RTS or Roadster Transport System) up to accomodate all the photo equipment I'd need for many short assignments. It comfortably fit my D2X, an 18-200, 70-200 f/2.8, 1.7x TC, filters, SB-800 flash, and even room for my Targus laptop power adapter. That still left room (although I had to supply my own neoprene padding) for my laptop in the front section and my most used travel electronics (headphones, Dell Axim PocketPC, etc.) in the middle section. Set up this way I could use the Roadster as my only carry-on. For flexibility I kept a small, collapsible Kiva daypack clipped to the side along with my cellphone. That way if I wanted to carry lunch on the plane or wound up with more to carry on the way home I could expand it and still be well within the current airline carry-on regulations. The Roadster is also slightly lighter than the Trevi.
I do have some suggestions for what I'd like to see to make the Roadster even more effective:
-
I wish it had a 1/2 divider for one side in "notebook" configuration so I could easily keep my batteries & charger in one half of the other side of the RTS and my external hard drive and mouse in the other without them becoming jumbled.
-
I w ish the RTS (insert section) had a handle. Then it'd be great to use as a "mini-case" for carrying (say) my laptop, mouse & external drive around a camp or lodge without lugging the whole briefcase. While I'm wishing I wish the insert had a little more rugged exterior (like the laptop insert in the Lowepro Stealth, for example), so it'd hold up to that usage. The current design is fine for an insert in the bag but not designed to be used independently.
-
I liked the 3 padded vertical pockets on the Trevi. They are great for external drives, headphones, etc., keeping them protected, separate from each other, and easy to retrieve even when the case is under your feet on an airplane. Roadster's mesh vertical pockets were a little too short for some of my accessories (because there was a horizontal pocket underneath them) and not quite expandable enough for my PocketPC in its case or my headphones in their case.
At 17" x 9" x 13" the Roadster is a little smaller (shorter) than the Trevi. This gives it a little less room inside but has the advantage of keeping it below the airlines formal 14" height and therefore making it slightly easier to fit under your seat or in a smallish overhead. However, it's shape is fairly firm at the full size so you really need an area with that much room, while the Trevi--if not overpacked--is a little easier to squish at the front corners. The Roadster is also a less expensive option than the Trevi if you're on a budget.
Both of these rolling bags are heavier than a traditional "stap" briefcase because of their stiff back and rolling mechanism, so I don't find any roller fun to carry locally. If I need to do much local travel I tend to load a smaller, lighter briefcase--although the hassle of moving from one to the other is frustrating.
A Note on Carry-On: Okay so we're photographers. In a way that makes us special and we do tend to have unusual needs when traveling. But we're still "citizens" on board the plane. I try to make sure that if space is tight one bag can fit under the seat in front of me and one in a reasonable piece of the overhead out of respect to other passengers.
At the Airport -- A Travel Workflow
While not as important as digital workflow, having a good "travel workflow" can be quite useful. These tips will vary greatly depending on your airport, airline, destination and photo gear needs, but here's what I'm doing currently:
-
I use Curbside check-in for bags whenever possible. This tends to be quick and offloads them right away. You can instead opt to check the bags in at the counter and in many cases watch them go through the TSA screening if you're worried about the TSA search. However in my experience my bags have often been opened someplace in the airport after that initial screening so I'm not sure how much watching the first TSA checkpoint buys you over just using a TSA-approved lock.
-
Then, before getting to security, I fill up the front expandable pocket of my carry-on with all the little things security hates. Phone, pocket camera, sunglasses, etc. That makes it quicker to get through security and less likely for me to lose anything. Keys get clipped to the "key leash" in my briefcase. My wallet goes in one of my shoes to go through the X-Ray. My laptop is in a slim neoprene case inside my briefcase, so when I pull it out to put it in a tote by itself it has some padding. Sometimes I get asked to pull it out of the neoprene, but usually not.
-
Once through security I pull all the "excess" items out of the front of my briefcase and put them back in my pockets. The biggest reason for that is most laptop briefcases (including mine) will just barely fit under a normal airline seat if they are lightly packed. Once you've stuffed their front pockets they may not fit very well. So I want to make sure I can get the briefcase stowed quickly once I'm on the plane.
-
My carry-on bags (1 or 1 + briefcase) all go over one shoulder. This tends to make them look like less of a load and pushes one behind the other. If you have a big bag on each shoulder you're a lot more likely to have trouble physically getting through the gate and the front of the plane and a lot more likely to be asked to cabin check something. The key to getting gear on the plane is to be quick and polite. If you can effectively and safely stow your gear without bothering other passengers you'll usually be fine. I had one flight attendant on a recent regional flight explain that my Roadster wouldn't fit at my seat. I politely said I'd give it a try and be sure to bring it back if it didn't. As it turns out it slid perfectly under even the smallish seat in front of me and all was well.
-
Once in the air I often pull out my briefcase from under the seat in front of me and use it as a foot rest or at least place it under my knees to allow my legs (which are fairly long) to stretch under the seat in front of me. How well this works depends on how much legroom you have. This is one reason I really like traveling with the Trevi. I can not only unload my computer from the top easily, but my spare batteries are also accessible the same way.
This may all seem like a lot of hassle, but I travel close to 80,000 miles each year with photo equipment so having an effective way to make sure I arrive safely with all the equipment I need is a critical part of my business.
ALERT: What about this recent "liquid bomb" scare? It's important to note that except for flights originating in the UK, the recent alleged plan to use liquid explosives has not technically changed the amount or type of carry-on bags you can bring with you. It has caused a ban on liquid and gel substances in carry-on, which is certainly an inconvenience. And the TSA has asked passengers to reduce their carry-on to help make the added screening not take more time--but that is a voluntary request so far. Finally, the TSA took the opportunity to require all passengers to remove their shoes, which before was optional. Ironically, perhaps, the additional need & desire to check luggage has made the carry-on bins less full and therefore easier to use on many flights since this event. But we don't know yet what long term effects it might have. The TSA is always toying with the idea of further restricting carry-ons to make their jobs easier.
Shipping Gear
FedEx
Often I have shipped gear via FedEx ahead of my arrival, normally in the care of a local friend or participant or simply to the hotel where I am staying. I don't tend to want to use this for camera gear as I normally want that with me, but it has worked well for projectors, screens, speakers and other electronics or for a specialty lens or two.
TIP: If you or a family member are or were members of the US armed forces you may be eligible to join USAA. You don't need to use their insurance or any of their products, but after getting your free USAA membership you're entitled to their discount for FedEx, which can be substantial and makes this option much less expensive.
SportsExpress
It isn't cheap, but SportsExpress will haul your bags from your home or office to your destination for you. If you have a couple days notice and can send your bags early the service might cost you $200-$300 per bag round-trip within the US. If you want your gear shipped overnight it'll cost almost twice that much. Some of our safari participants have had good luck with using SportsExpress for excess gear, but the cost and time required are of course the downsides. SportsExpress does offer some overseas options to major destinations, but it is even more expensive.
Canon SD700IS: Beautiful images in a small package
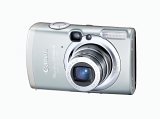 
Canon PowerShot SD700 IS |
The tiny Canon SD700IS is the first ultra-compact to feature optical image stabilization, using Canon's latest IS technology. I traveled for several weeks this summer using one as my "vacation" camera and was very impressed by the small size, sharp images and effective stabilization, But the camera definitely has some quirks. Is it for you? Read on and find out... |
Overall Impression of the SD700
With the Canon SD700IS Canon continues the tradition of good things coming in smaller and smaller packages. This little gem of a camera not only takes very nice 6MP images, but Canon has added image stabilization to it. Ironically, perhaps, I find IS to be more important on point and shoots than on the larger D-SLRs, for several reasons: First, the shutter lag is harder to predict so it is easier to start moving the camera while the shutter is open or even to be surprised by the shutter going off before you expect. Second, the point and shoot cameras are small and harder to hold steady. Finally, and perhaps most importantly, you're most likely to focus you P&S through LCD so you can't hold it against your had to steady it.
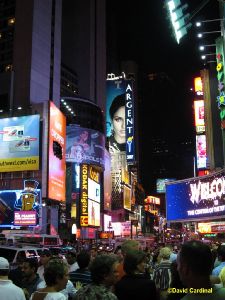
New York Times Square
Canon SD700IS, 1/30s
|
The IS on the Canon worked well, routinely giving me sharp shots down to fairly low shutter speeds like 1/30th (this nighttime street scene for example) and 1/60th--as long as my subject wasn't moving of course. I found the Flash & ISO controls easy to use as well, which was great. The zoom also uses the standard Canon control which I'm used to although I prefer a rocker switch. The cameras menus were certainly fine and included exposure compensation which is of course useful. |
Extreme IS
But how far could I push the IS capability? Quite a ways, as it turns out. The two photos below were shot hand-held with remarkably long shutter speeds. Note, I'm not advocating doing this routinely and both shots would have benefited from proper use of a tripod, but it was amazing that they worked at all. Note that the focus point is on the stuffed cat on the sofa in the dollhouse image. You can see the effects of the limited depth of field by looking at the items on the table that are slightly out of focus. The one feature I really wish the SD700 had was a way to control aperture more effectively to manage depth of field. You can also see the barrel distortion in the magazine shot, but that is to be expected.

Dollhouse interior, ambient light
Canon SD700 IS, 1s
|
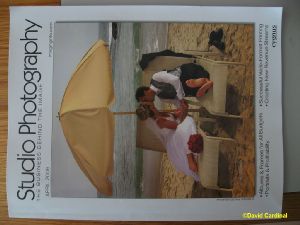 Magazine Cover shot in Macro Mode
Canon SD700 IS, 1/4s
|
Noise & Noise Reduction
You'll notice that the image on the left also has very low noise for a long exposure with a compact camera. That's because when you use the SD700's "Long Shutter" mode you can set the shutter speed from 1s and up and the camera automatically also uses dark frame noise reduction on the image. The feature is a little hard to use, but it is documented in the manual. A more serious issue with it however is that it seems to keep the lens fairly wide open. I couldn't find any way to set the camera to use a long shutter speed with a small aperture, which would seem like a natural request for "macro" or other scenic or studio type shots.
In general the SD700 had vey low image noise, certainly at ISOs up to 200, and even fairly low noise at ISO 400. Above that, at ISO 800 and ISO "HI" there was a lot more noise, but that is to be expected. The images are also amazingly sharp with very impressive detail.
Quick hitter
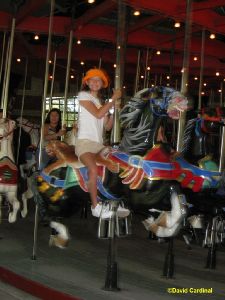
"Action Shot"
Canon SD700 IS, 1/60s f/3.5
|
The SD700 was quick and responsive, with a small shutter lag. As always with compacts you do need to be aware that the flash recycle time can be long and pre-focusing is a must. But if you have the flash ready (or turned off) and have pre-focused you can easily get action shots like the one of a girl on a carousel to the left. The image is slightly blurred from the 1/60th shutter speed, but the lens was wide open so the only option for a sharper image would have been a higher ISO setting (the camera was set to Auto ISO. It also has an Auto/HI ISO which might have been helpful in this case).
[Unfortunately the SD700 does not appear to record the actual ISO used when in Auto ISO mode so it is difficult to tell after the fact. Canon's Zoombrowser just shows it as "Auto" in that case.]
|
Macro Monster

Silk Tree
Canon SD700, 1/320s f/5.6
Macro Mode
|
The Macro mode worked wonderfully. I was amazed by the level of detail the SD700 could capture in closeups. It focuses down to a few inches and achieves good overall magnification for a compact. The macro mode does have three nagging weaknesses though. First, you can't rely on the viewfinder since it is thrown way off by parallax, so you need to use the LCD for composing, which makes it harder to see and hold the camera in many cases. Similarly the flash is disabled as it of course isn't suitable for macro use. These issues aren't unique to the SD700 but affect almost all compacts. But the third issue is the most important: There is no way to manually select focus areas on the SD700 and when I focused on flower scenes often the camera would decide to focus on the background, which ruins the shot. The workaround is to put the camera in manual mode, turn AiAF off (which locks the camera onto the center AF sensor) and then focus, recompose as needed, then shoot. This is an okay solution, but I still wish I could choose which AF area the camera was going to use.
|
User Interface
All compact cameras face a tough tradeoff between offering features and keeping their controls useable. I found the controls on the SD700 fairly straightforward. Perhaps the most confusing thing is that some of the functions of the mini-joystick are asymetric. For example, pushing it "up" changes the ISO, but pushing it down instead of lowering the ISO changes the drive mode. To fit as many commands as possible on the joystick some like the ISO and drive mode cycle based on pushing only one direction. But when used to navigate the menus the joystick operates in the more normal mode where you can move the selected item by pushing in that direction.
Video in a Pinch
While no competition for dedicated video cameras, the tiny SD700 does take acceptable VGA quality video, although you can't zoom once you start shooting.
A Glaring Omission?
The SD700 does have one lack that really surprised me. It does not appear to be possible to control either the shutter speed or the aperture directly. In fact, until you look at your image on the computer you can't even tell what shutter speed or aperture the camera has chosen. You can influence the camera by using one of the scene presets or even the slow flash sync option, but there is no equivalent to Tv (S for Nikon) or Av (A for Nikon) mode on the camera at all. I found this very unsettling. I'm sure for many people it wouldn't matter at all, but I'm so used to being able to work from a Depth of Field or shutter speed perspective that I really missed them. There is the long shutter mode to set shutter speeds over 1s, but that is really much more of a special purpose function and doesn't do much to reduce the need for an Av or Tv mode. The camera doesn't even display the shutter speed or aperture it is going to use (or did use) unless you are in long shutter mode. You need to browse the EXIF data on your computer to find it (although I can imagine a firmware update fixing that piece of the problem).
For me, the lack of an Aperture priority mode (I can live without the Tv mode on a compact) probably means I won't wind up with an SD700 long term. At least not unless I can figure out some way to achieve the same effect through the various scene presets. Some photographers will also bemoan the lack of a Raw mode, but it seems like very few point and shoots and almost no compact cameras offer a Raw mode so the Canon SD700 is hardly alone on that.
Bottom Line

Sunset at Cape Cod
Canon SD700 IS
1/200s, f/5.5
|
If the SD700 had an Aperture mode it'd be a no-brainer for me to use as a pocket camera. It takes awesome images, works quickly, has a useable but simple interface and has a good overall feature set for a compact camera. If you don't spend a lot of your time trying to manage the Depth of Field in your shots, then the combination of image quality, size and effective IS make the Canon SD700 IS--at under $450 discounted--a camera you should consider owning.
If you'd like to see some of the travel shots I took with the camera, check out our Canon Powershot SD700 Image Gallery. Note that all images in this review and in the gallery are JPEGs straight from the camera with no modifications other than resizing for the web.
|
Nikon Coolpix S10 Announced
For those interested in IS/VR in a compact but wanting to stick with Nikon, Nikon has just introduced the Coolpix S10, with a 10x Zoom and Vibration Reduction in a "shirt pocket" camera. Read the full announcement.
DigitalPro Tip
DigitalPro4 has been updated to include support for JPEG2000. The update is free to all licensed users of DigitalPro 4.
Website & Forum Updates
August 24: BREAKING NEWS: Canon announces Digital Rebel XTi/400D 10MP entry level D-SLR. With 3fps, .2s startup time and 9AF points it's a clear step up. Read the announcement, or their Rebel XTi White Paper.
August 24: Canon issues white paper on full frame sensors. Some good highly technical information on sensor history and design, although of course there is plenty of marketing spin thrown in to help steer readers into wanting their very own full frame version.
August 9: Nikon D80 Announced: 10.2MP, 3fps, $1K price point. Specs include a 200 ms powerup and 80 ms shutter lag--plus my favorite, the 11 AF points found on the D200 and D2 series. Read Nikon's Announcement.
We're pleased to announce that Dave Ryan as agreed to serve as co-moderator of our Wildlife & Scenic photography forum. Dave is already a longtime contributor to the forums and the site, having written our intro articles on Raw Converters and Image Resizing. Dave is a photographer, photo instructor and mountain guide in Jackson Hole, Wyoming. He sells greeting cards as well as stock photographs of action sports, wildlife and landscapes.
Support our Site Sponsor, ProShow:


|
|
|
|